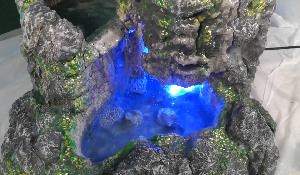
Waterfall Construction for the Beginner
On this webpage I'll be going over the techniques and decisions I made
to make this waterfall for the beginner. The steps I took are very similar to all of the other waterfall construction projects on this site.
The difference being that I made
it a lot faster with not as much attention to detail than the other
projects. Be sure to check out the video below which has a full voice
over describing all of the steps I took to complete this indoor
waterfall.
This tabletop waterfall can be made for a living creature, but be sure to do your research on whether your pet would appreciate having water
in it's cage or not. A water dragon and several other lizards and
toads etc. would be able to deal with having water in their cage, but
other critters (such as a bearded dragon) could suffer because of it.
So, you might error on the side of caution and just make the waterfall
for yourself!
For inspiration I usually go to a website like morguefile to find
pictures of waterfalls or whatever you might need a picture of. They
allow you to alter the photo or do as I do and just get ideas from the
photos.
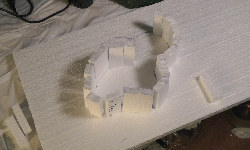
For the design, I try and measure out how big and tall I want the
indoor waterfall to be. I also do a basic drawing of the design before
proceeding to the waterfall construction.
Once I have a design in mind I'll start cutting up pieces of
polystyrene that I get at a hardware store and build up the structure
of the main pond. Check out the materials list video on the FAQ page
for a detailed list of what you'll need for this waterfall
construction.
For a couple of years now I've been using some hotwires from the Hot wire foam factory to do a lot of the cutting of the foam. I still use a knife in tandem with the hotwires as there are benefits to using both.
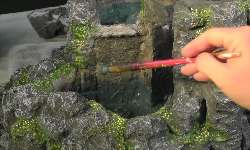
The painting stage is the most fun part of this process. I use a
dollar store water bottle and mix in water and a little dark grey
paint. I'll spray this all over the structure to give it a nice dark
look, -and I do this so that it's easier to apply lighter colors to it
and have those colors show up better. After the base coat of paint is
dry I'll do a series of dry brush treatments over the areas that I'm
trying to make look like rock. The video above on this waterfall
construction does a much better job in showing this process of using a
dry brush.
After the rock is painted -I painted the indication of some green
growth around the landscape which really separates the rock formations
from each other. I followed that with painting in some cracks in the
rock just to add some detail.After the painting stage I sealed it with a non-toxic sealer that is water resistant. You'll want to put at least four layers on if you're making this for a living creature.
|
If you're making this just as an | So, take these waterfall construction ideas and build yourself an indoor waterfall that even the beginner can do! |
