|
Fake rock wall construction -advanced level
The story of building this fake rock wall landscape is as follows:
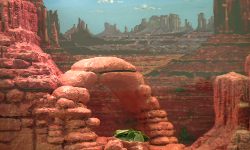
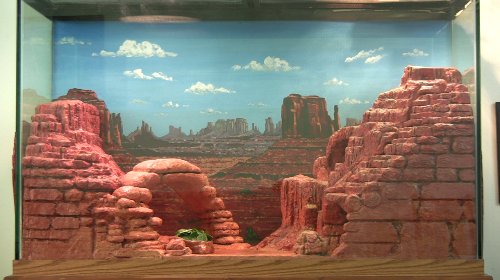
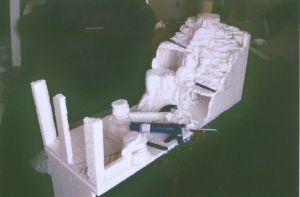
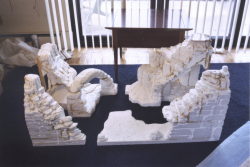
I bought a top loading aquarium (110 gallon) for next to nothing, and was determined to make it work with an old idea I had of making a fake rock wall that sort of filled the tank. This presented quite the challenge. I soon realized that it had to be built in a jigsaw puzzle like style. My stubborn nature wouldn't let me accept the fact that a front loading cage would be so much easier. That, and the money I saved from the deal I got on a top loader led me down the path of creating a rather time consuming but fun -fake rock wall for a lizard cage. I unfortunately don't have any other early pictures than this one
of the polystyrene (styrofoam) sculpting process.
Unless you're really wanting a challenge I strongly recommend a front loading tank. Also, check out the Lizard store for fun lizard products. For ideas on how it would look I browsed the web doing image searches for such topics as desert landscapes, canyon landscapes and natural archways. The public library was also a good source for free images to get inspired by.
For the puzzle side of the design it was just trial and error. I started over on many sections of the sculpt before it became functional. The challenge was to get it looking like one piece. I also wanted each side
to be hollow to provide hides -one on the hot side -one on the cool. This also
increased the floor space.
Polystyrene(styrofoam), Liquid nails, Knife, File, 4 thin pieces of wood for extra support -usually a hardware store will have a bin of scrap pieces of wood for very little money. Non-sanded grout (white is the cheapest), Cement color, Acrylic paint, A few dollar store water bottles, Non-toxic all surface sealant, and fine grain sand.
The only real mistakes you can make: 1. Not measuring for the length and width of the cage you're going to put the landscape in. 2. Not taking into account the increased size and weight that the structure will have after you apply the many layers of non-sanded grout. So even if you do the first one (measure) you could still have a problem with the fake rock wall fitting into the cage. -You can always add more grout to offset a slightly too small piece, you can't -without alot of work- remove part of a too big piece to fit into the cage. 3. Not covering every area with at least 3 layers of grout. 4. Not sealing the fake rock wall (every area) with at least 4 layers of Non-toxic all surface sealant. 5. Not creating a safe environment for your pet lizard. You don't want to build a structure where the lizard could easily fall from a high section of the landscape. The fake rock structure featured on this page has high sections, but the two tall sides of the landscape have rock staircases that the lizard could grab onto if it were to lose it's footing. The only area that has a direct drop down is the natural archway, -only about 10 inches off the ground. I also sprinkled fine grain sand on the high traffic areas for traction. 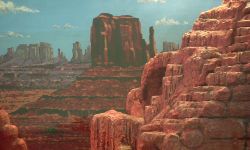
The first step is measuring the cage. Determine if you are going to permanently glue the structure in, or if you want to be able to take it out. I wanted to be able to take it out and hose it down! Probably more sanitary.
The second step is cutting out the polystyrene into the shapes or structure pieces you want Looking at pictures of natural landscapes helps.
The third step is gluing the pieces together I used liquid nails. It holds quickly so you can keep working instead of having to wait till the section drys.
The fourth step is to make sure the structure still fits I recommend putting the structure back in the cage before grouting
just in case it's too big.
The first layer should be rather thin to get in all the little nooks. Each layer after that should be progressively more thick. You can add cement color to the grout mix, and just have that be the way the color is applied. Or you can use acrylic paint, -either with a brush or sponge. Or, get a dollar store water bottle, put a little water in the bottom and a little acrylic paint, mix it up, and you've got a cheap paint gun.
The sixth step is applying 4 to 5 coats of a non-toxic water based sealant Again use a water bottle. Put in a little water and a little sealant, mix it up and you've got a much easier way of applying the sealant than a paint brush. I do apply one non thinned out layer of the sealant (with a brush) for the final coat on the high traffic areas. Important Note
This project is meant for a lizard with a dry environment. If you have a high humidity lizard, like a water Dragon or chameleon, you want to use a non-toxic 100% acrylic sealer. This is more water repellent than Mod Podge all surface sealant. If you want something that you can completely submerge in water, you'll want to experiment with aquarium silicone sealant. They use this to make sure an aquarium won't leak, so obviously water is around it 24/7. Aquarium silicone sealant does have a different look to it though, it dries in a flexible rubber finish. To see a high humidity water project check out the fake rock Waterfall The seventh step is applying a fine grain sand before the final layer of sealant dries I do this to areas where the lizard will need traction. It also helps the fake rock wall have a dry look.
The obvious drawback to this, or any other complex fake rock wall, is the extra time it takes to clean it. I think it's worth it, I can only assume you're pet lizard thinks it's worth it, so why not. Think of it this way, you might not get another chance to create a ridiculously time consuming, over the top, elaborate landscape for your pet lizard!! Or stop by the Lizard store for fun products! Are you wanting to create a nice cage for your fake rock structure to go into? Check out reptile-cage-plans.com and learn how to- build the perfect snake, iguana or other reptile cage. They guarantee ways to save you money and have fun with plans that make it so simple, anyone can build homemade reptile cages and save money.
If the average person learns better with pictures, then one should really excel with video. Check out the video I made that details the process of this complex fake rock wall. Do you have any fake rock tips or techniques?Share your fake rock creation tips or stories! What Other Visitors Have SaidClick below to see contributions from other visitors to this page...
6ft uromastyx paradise!
Creating my small pond
Fake rock vivarium for bearded dragon
My first attempt
My first attempt
next time
Karma's Mansion
Rockey's Fake rock canyon.........inspired by lizard-landscapes.com
4ft eastern bearded dragon
False rock creation techniques
Fake rock project tips
Tips on preventing damage to your fake rock |


 I do have a short video about this
 The materials I used:
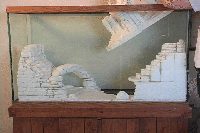 The fifth step is applying non-sanded grout (4 to 5 layers)
